Create Heat Transfer Designs With This Free Tool
Create Heat Transfer Designs With This Free Tool
Streamline your creative process using EasyView's free creation tools—artworking heat transfers have never been easier.
As a business owner, finding the time to learn and understand Adobe software such as Photoshop or Illustrator can be difficult. And that's without even touching on the cost of purchasing the software subscription. If you're looking for a simple and free way to design your tshirt heat transfers, you've come to the right place.
Today we're going to show you, step by step, how you can use the Stahls' EasyView uploader to design tshirts using its completely free text creation tool and stock design library.
First up, if you've never heard of Stahls' EasyView Uploader, then let us expand. EasyView is the simplest way to order heat transfers online in the UK. Just upload your design, arrange your heat transfer sheet and place your order. It goes into production straight away with no wait times or awkward back and forth over email or phone. But you're here because you want the ability to design heat transfers not upload them right? EasyView by Stahls' offers an innovative text creation tool where you can utilise its many settings to create a best-selling tshirt design for your business. On top of this, combine that function with the free stock design library and you're on to a winner.
Follow along below:
First, make sure you've chosen your heat transfer type and opened up the correct size heat transfer sheet. No idea what we're talking about? Familiarise yourself with the website using this Youtube video tutorial here.
First up:
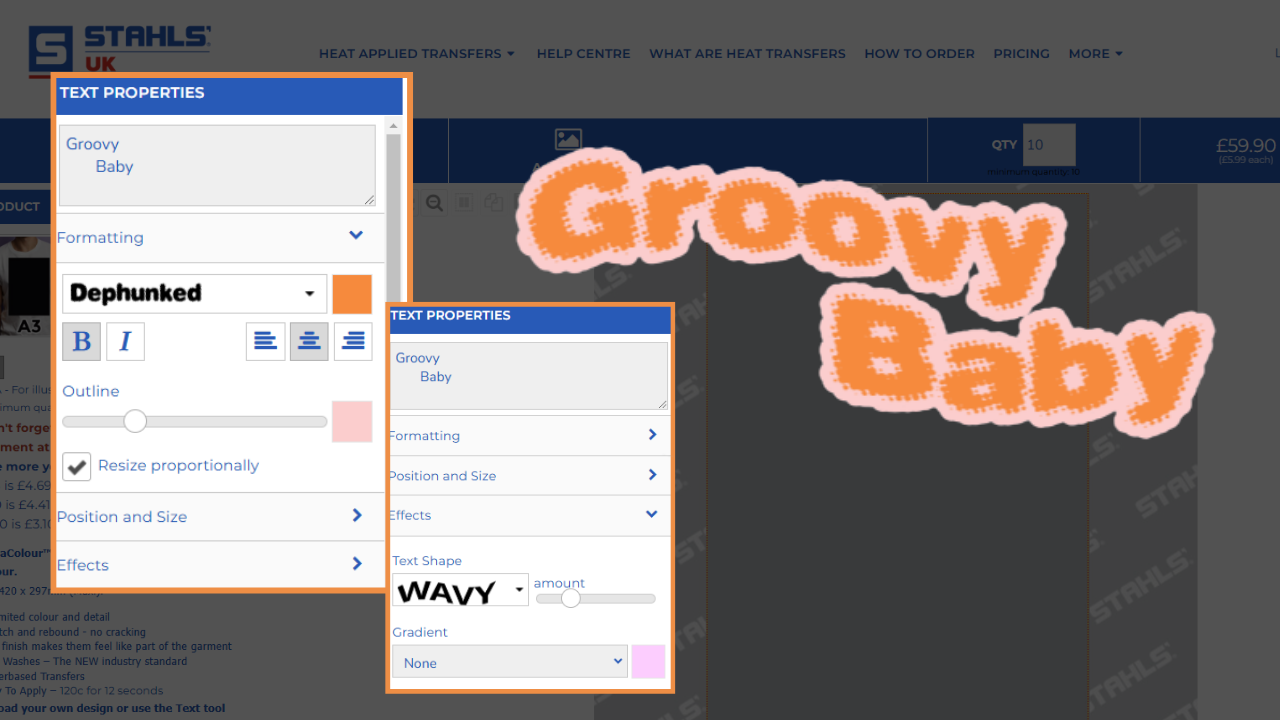
Groovy Baby. For this design, we're channelling 60's retro vibes.
As you will see from the screenshot below, to create this text layer we have separated the words into two lines and added to off-centre spacing. We've chosen the colour orange as our text colour.
Next, we browsed the extensive font library and chose 'Dephunked' which offers this retro half-tone kind of vibe.
Our alignment is set to the middle setting and Bold is turned on to thicken up the text.
After this, we increased the Outline slider and chose a nice pastel colour to compliment our Orange text.
Moving on to the Effects panel, we've selected WAVY as the Text Shape and moved the slider to find the best wave intensity.
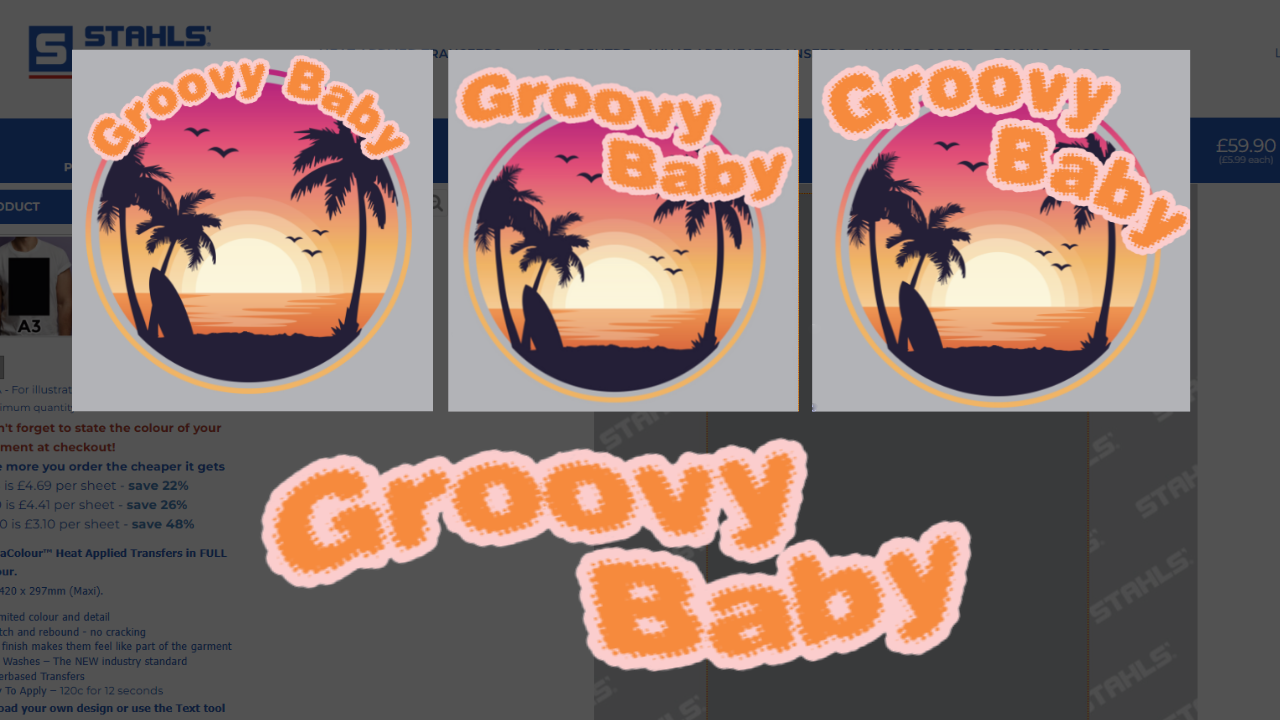
We're happy with this text-based design but just to show how you can enhance this design one step further, we've browsed the free stock library and found a gorgeous graphic of a beach sunset with similar colour tones to our original graphic. We've tested three different text layouts to complement this design. Which do you prefer?
Heat Transfer Type:
You'd need to print a design like this in UltraColour or UltraColour MAX to ensure you get the full gradient of the beautiful sunset graphic. Perfect for a full chest or sized down for a left chest logo.
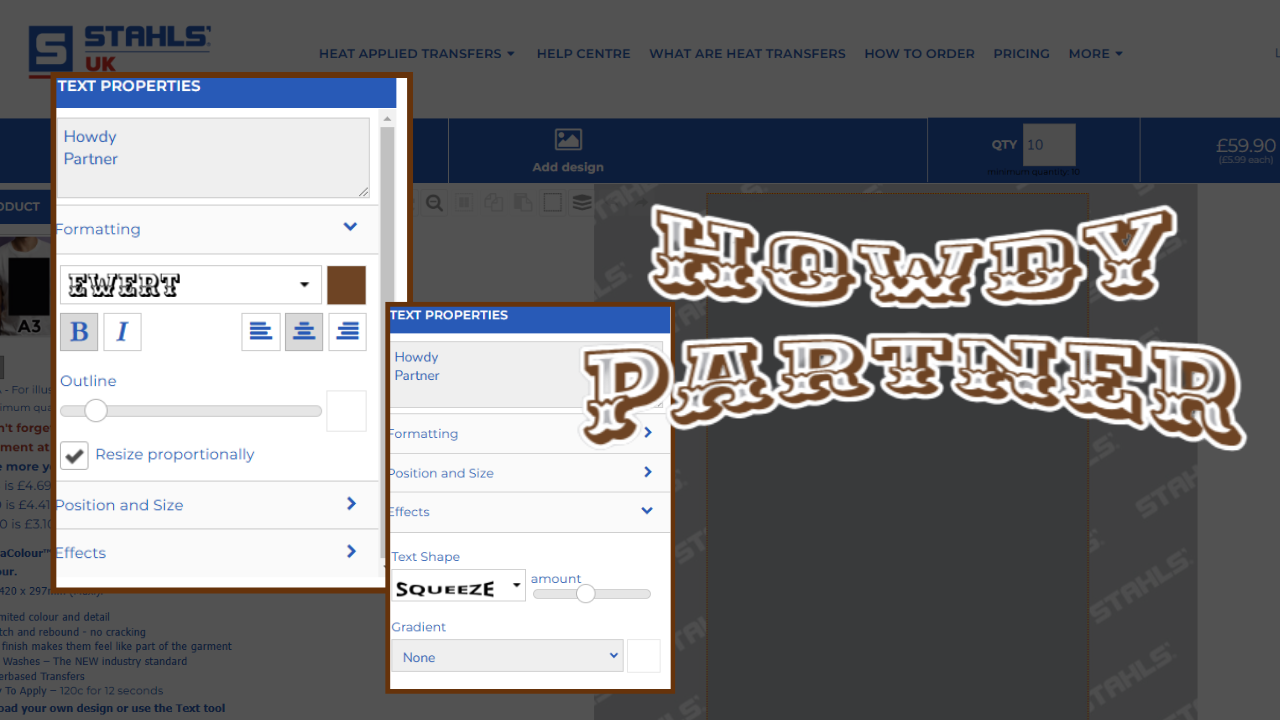
Howdy Partner - For this design, we are channelling the deep south & western cowboy style.
Again, we started with the two words on separate lines. We've chosen 'EWERT' as the font and let's face it, how could we ever use another font for this? This font is PERFECT!
We've chosen a nice rustic brown colour. The Bold setting is on and we are centre-aligned.
We've increased the Outline slider but we have made sure that the outline isn't too bold as we still want transparency between the linework for this particular design.
Next, we move on to the Effects section and we've chosen the effect called SQUEEZE to finish our design off.
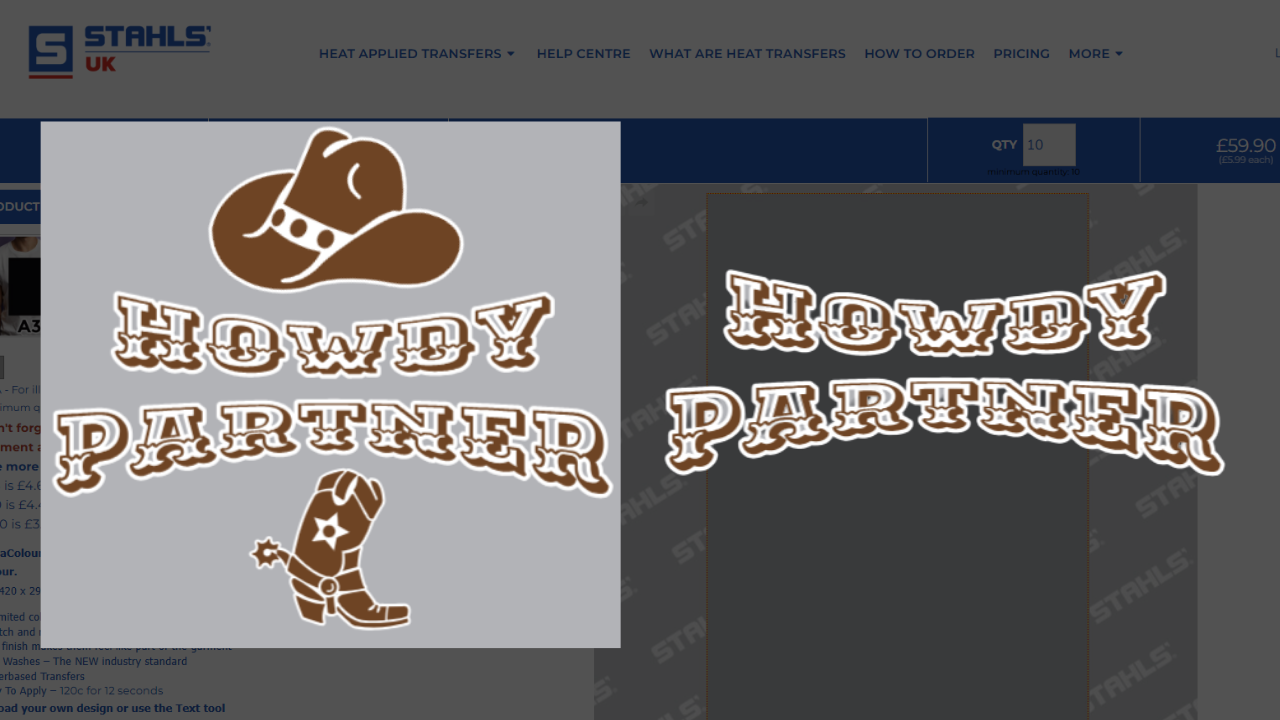
To take this design one step further, we have scoured the free stock design library for a couple of relevant graphics. We've chosen a matching rustic brown for these and we think it looks great!
Heat Transfer Type:
2 Colour Screen Printed Heat Transfer. This would make a fantastic full-chest tshirt design.
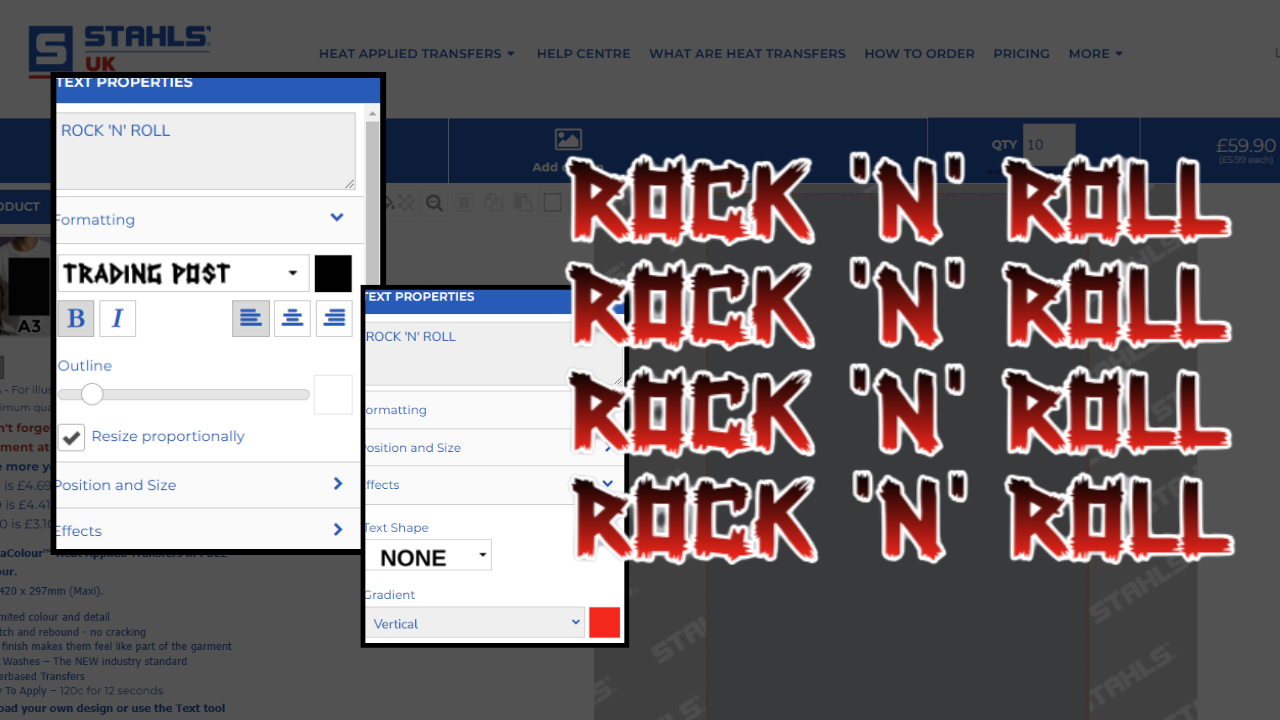
Rock 'n' Roll - Think edgy rock music band tshirt vibes for this design.
We've started with our design on one line and chosen 'Trading Post' as the font. This edgy font has rough edges making it perfect for the style we're trying to achieve here.
The Bold setting is turned on, but because of the symetricality of this design, we don't really need to pay any attention to the text alignment tool in this instance.
We've started with a base colour of black and chosen an Outline colour of white. Moving on to the Effects section, we have selected a Vertical Gradient and set this to be a red colour. The original base colour of black now flows and blends into the red for a multi-tonal finish.
Once we were happy with the colour combination, we used the copy and paste tool to duplicate the wording and arrange it into a full chest style text graphic.
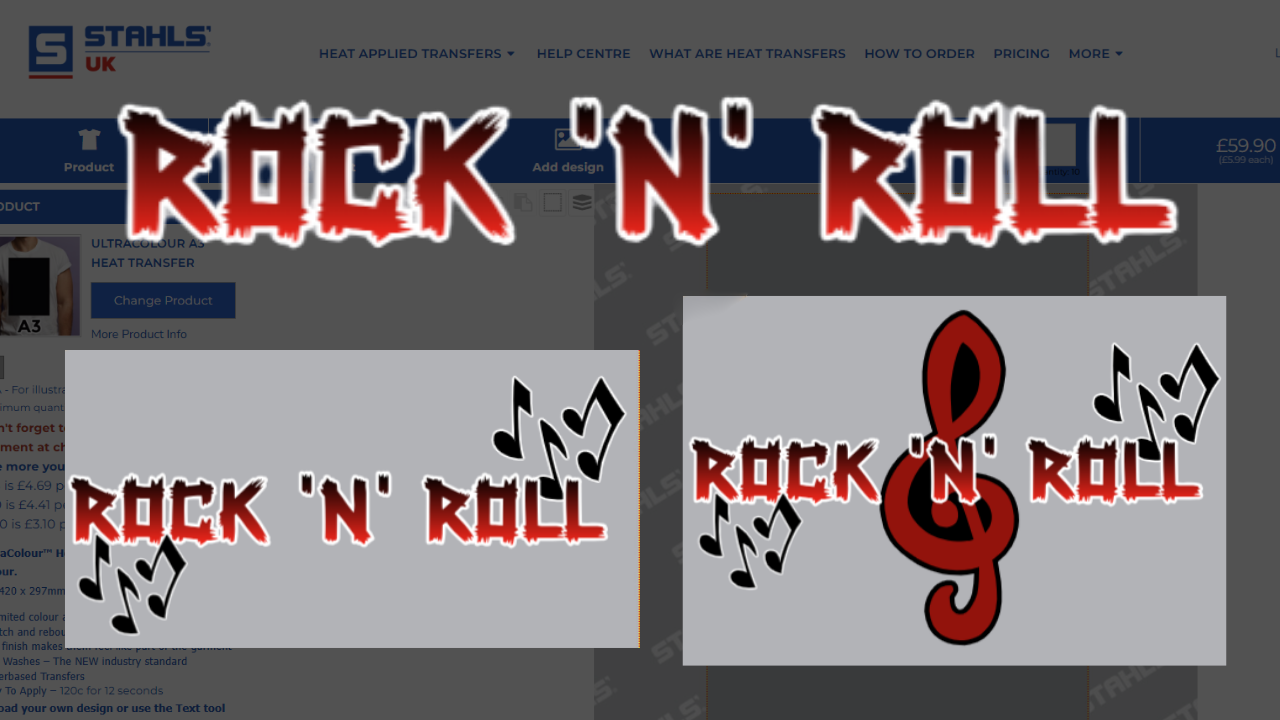
To enhance this design, we've scoured the free stock library for some music-related designs and found some great clusters of music notes and a treble clef design. After changing the colours to suit our colour scheme we think this design has come out pretty well!
Heat Transfer Type:
Because of the Black to Red gradient in the text, this design would need to be printed as UltraColour or UltraColour Max.
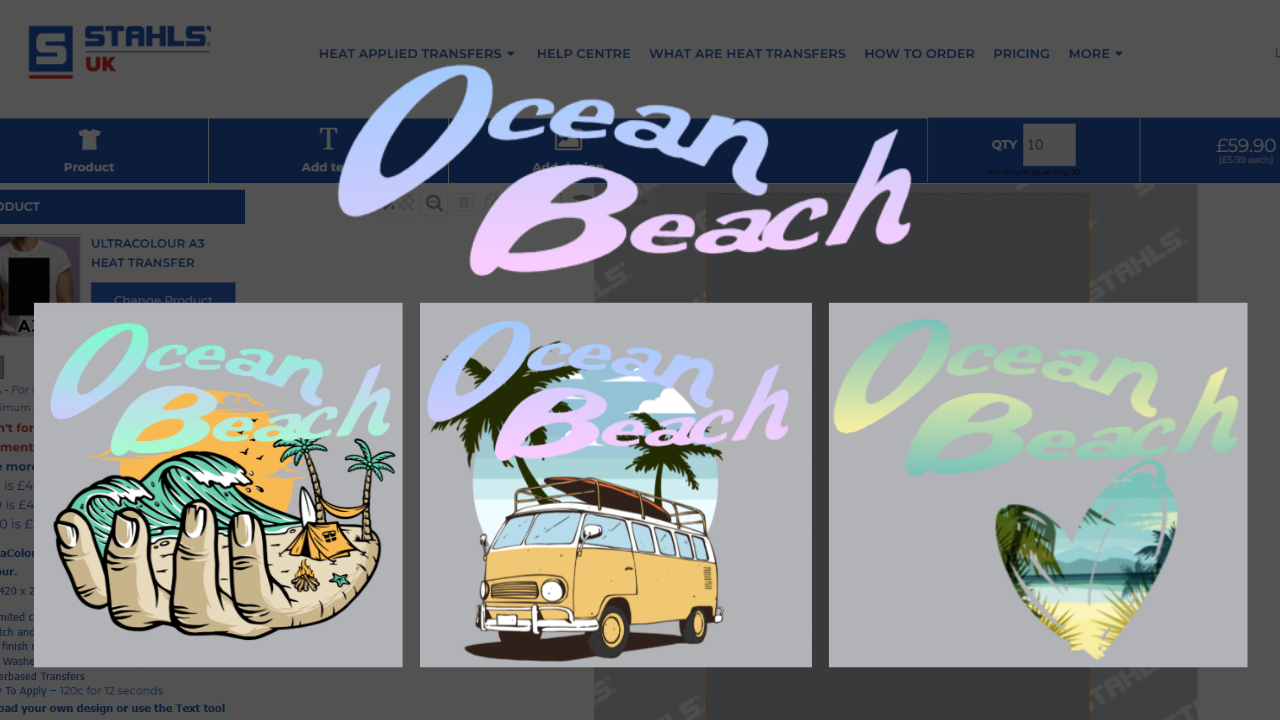
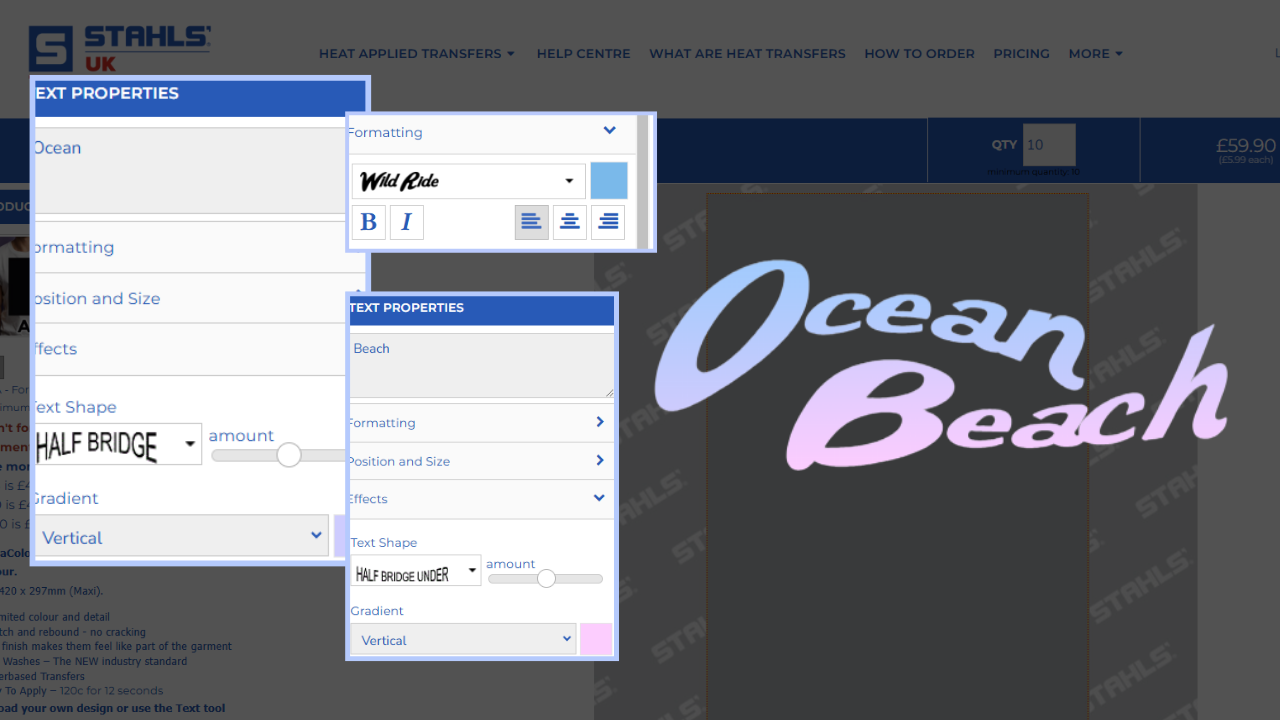
Ocean Beach - Think chilled Hawaii summer surfing vibes for our final design of the blog.
This design requires two separate text layers. One layer has the word Ocean. And the other layer has the word Beach. Both are set to the font named 'Wild Ride'.
For the Ocean Layer, we have chosen a pastel blue as the starting colour. Next, we're moving to the Effects panel and choosing the shape HALF BRIDGE. After this, we chose a Vertical Gradient and used a pastel purple colour. This will sit on the bottom half of the word Ocean so that the colour blue flows into purple.
For the Beach layer, we have matched our base colour to the gradient colour of the Ocean layer. This is so that when they're placed near each other, it appears that the colours are flowing over both layers despite the fact they are not connected. For the Effects section, we have chosen HALF BRIDGE UNDER, which bends the text the opposite way to the Beach layer. We have added a Vertical Gradient to the Beach layer which is pink so that when the design is whole, you can see a seamless blend of blue, purple, into pink.
To take this design one step further, we headed straight to the Summer section of the free stock design library as we knew there were loads of incredible full-colour graphics we could use with this design. After a couple of different colour tweaks, we've created three fantastic variations.
Heat Transfer Type:
Because of the colour gradient in the text, this design would need to be an UltraColour or UltraColour Max Heat Transfer.